Introduction #
The purpose of this article is to provide reverse engineers with a framework to build and deploy a safe malware analysis environment on Apple Silicon machines. We will talk through how to successfully deploy a Windows 10/11 endpoint via VM, an ARM Linux machine and the most useful tools to install on either machine to make your life easier when it comes to analysis.
At present, it can be quite confronting for malware analysts to make the jump from x86 to ARM processors for their research. Understandably so, since there is some weight to the argument that x86 tech cannot run effectively on ARM-based processors (particularly when you’re speaking about historical operating systems like Windows 7, Windows XP and Windows servers). But to that, I say, pah! There are definitely resources available to you right now that enable you to effectively and efficiently virtualise these legacy systems on Apple Silicon.
I’d like to remind folks reading that this blog post is subject to change as and when more companies start leveraging ARM-based technology to power virtualisation. I’ll endeavour to update this as and when I learn and discover more about the progress made to support ARM virtualisation and malware analysis.
The Analysis Environment #
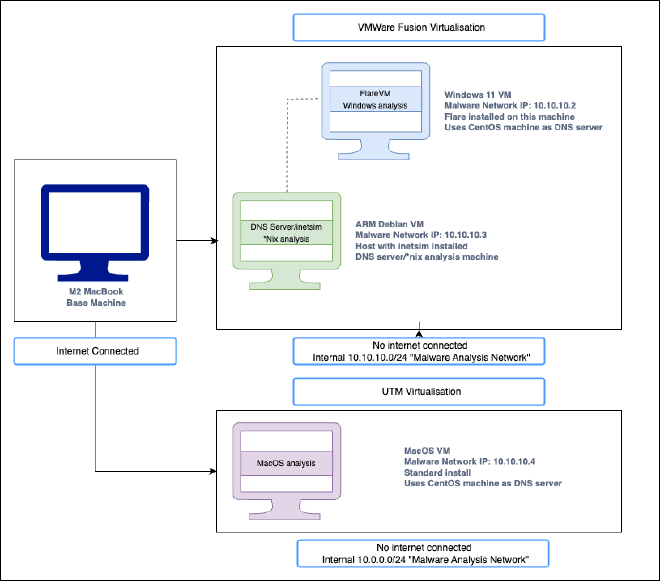
Your setup will entirely depend on what types of malware you intend on primarily analysing. In the case of this article, we will be covering the two of the three key operating systems: Windows and Linux. MacOS is unfortunately not supported by VMWare Fusion at present, so we will cover UTM and MacOS virtualisation in a separate article. My own personal environment is reflected by Figure 1 below:

Though certainly not necessary, it’s nice to have one of each operating system type to enable you to easily and quickly spin up a machine when the time comes for analysis.
Note that we will not be covering the installation process of the MacOS machine in this blog. That will be completed in a separate entry to this series.
Virtualisation Platforms #
As Apple continues to invest and release ARM processors, there has been a slow uptake in companies building virtualisation platforms that enable you to appropriately virtualise the key operating systems for broader malware analysis. Coupled with this, Apple has developed a virtualisation framework to enable those interested to effectively build their own virtualisation platform on Apple Silicon endpoints.
If you’re interested, you can check out the documentation and its respective tutorial here.
Here, we will cover set up using VMWare Fusion .
Note that not all available virtualisation platforms will be covered in these articles. The major focus are on the cheap price to entry models, namely UTM and VMWare Fusion.
VMWare Fusion - Windows #
The following section requires VMWare Fusion to be installed on your MacBook. Please follow the above link to download and install the program successfully on your computer.
Microsoft has released an ARM version of their latest operating systems (Windows 10 and Windows 11) that you can deploy to your M series MacBook (woohoo!). In order to download, you must sign up to Microsoft’s insider program. Now strap in, the installation and configuration process for this one is well honestly, a bit of nonsense.
Installation Steps: #
- Download the ARM installer from Microsoft. It can be a bit of a pain to find the iso after signing up, so just re-click the link provided her, and it should take you immediately to the download page on the site.
- Once downloaded, you’ll need to convert the
VHDXfile to aVMDKto make it compatible for VMWare Fusion. Open your terminal and enter the following commands:
# install qemu
brew install qemu

# check information about the VHDX virtual disk:
sudo qemu-img info Windows11_InsiderPreview_Client_ARM64_en-us_22598.VHDX

# convert VHD to VMDK, include -p to show progress of conversion
sudo qemu-img convert Windows11_InsiderPreview_Client_ARM64_en-us_22598.VHDX -O vmdk Windows11_ARM.vmdk -p
- Open VMWare Fusion and select
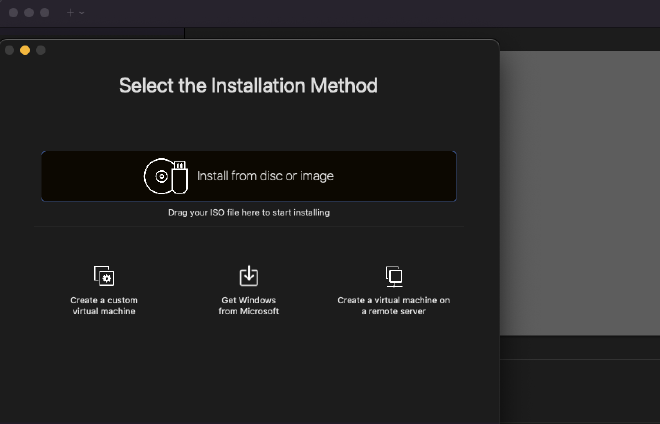
File>New Virtual Machine. A pop-up will launch titled “Select the Installation Method”
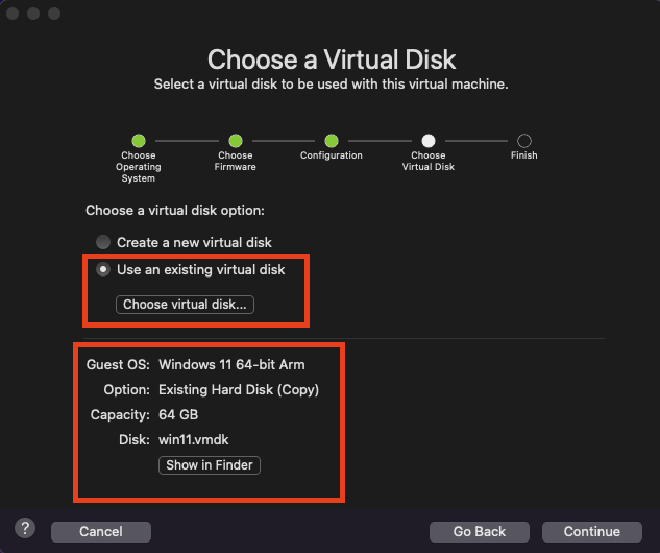
- From here, drag and drop your new Windows 11 vmdk file over the ‘Install from disc or image’ in the screenshot above. The prompt will immediately change, allowing you to configure the virtual machine. When you reach
"Choose a virtual disk", ensure that you select"use an existing virtual disk"and select the newly created vmdk file again here. This will ensure that you don’t encounter problems once completing the install process.
If you intend on installing FlareVM, make sure that you allocate a bit more hard drive capacity (at least 100GB I would say) to ensure that the installation process does not fail. If you forget to complete this, you can change it on creation of the VM which is handy, by navigating to
settingsand increasing the drive volume.

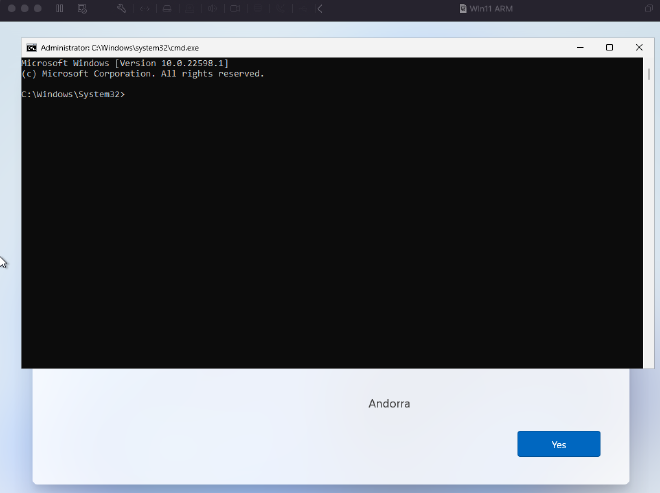
- Once you select Finish and finalise the process, a new window will pop open. This is your virtual machine. The operating system should start booting and look something like the following:

- When the first installation page loads, do not continue with the installation. Instead, install VMWare tools to enable networking. Press
Shift+F10to open a terminal to write the following commands:
# change into the oobe (out of the box experience) folder
> cd oobe

# type the following command
> bypassnro.cmd

# windows will restart and when prompted for internet access
# you'll be able to select 'i dont have internet' and
# 'continue with limited setup'

# continue with set up and turn off microsoft telemetry
- Complete the Windows 11 installation process. You shouldn’t be prompted by Microsoft to enter in any email information during this process due to the lack of internet connection.
Once finished, we will need to disable Windows Defender and reinstall VMWare tools to enable proper networking.
Reinstall VMWare Tools: #
- Select
Virtual Machinefrom the top bar and hitReinstall VMWare Tools. This will map the tools to D: drive. - Navigate to D: drive using explorer. Double-click on
setup.exeand proceed through the installation process - Restart the VM
- Confirm you are connected to the internet by navigating to a website via Edge and double-checking the adapter icon in the bottom right-hand side of the taskbar.
Disable Windows Defender #
An optional process that will likely save you some time and frustration when completing Windows-based malware analysis on this machine in future.
All credit for this section goes to OA Labs (video linked in the reference section) in walking through how to disable Windows Defender on Windows 11.
- Open msconfig by typing
msconfiginto the search bar on your VM - Navigate to the boot tab and select
safe boot > minimal - Restart the machine
- Open explorer and type
%ProgramData%and double-click onMicrosoft. FIndWindows Defenderfolder from this list and right-click, select properties. - Navigate to the security tab and click advanced
- Click the
changelink next to Owner: SYSTEM and click advanced - Select administrator by clicking the
find nowbutton on the right-hand side of the pop-up, This will grant you access to change permissions of the folder. Select okay until you have returned to theAdvanced Security Settings for Windows Defenderpopup. - Check the
Replace all child object permissions with inheritable permission entries from this objectbox and then select theTrustedInstalleruser from the list and remove their permissions. Repeat for the other users in the list until it is empty. - Apply the changes and select okay or yes for each prompt
- Open up
msconfigagain, navigate to the boot tab and disable safe mode. - Restart your computer and defender should no longer be present, as no one can access the folder
You can test that this works by searching for windows security from the taskbar. When you click this option, you should have a prompt that informs you that no one has access to the folder to open this.
Before proceeding to the next step, snapshot your Windows 11 VM. I like to call this one Clean with a description of the work i have completed thus far i.e disabled defender, internet connected.
Install Flare VM #
Download the FlareVM repo from github whichever way you prefer (via web browser or terminal or otherwise).
Note that Flare requires at least 60GB of disk space to install all the tools, so hopefully you followed the installation advice of upping the total storage amount when prompted.
These days, Flare is relatively easy to install, with the mandiant team doing some amazing work to make it simpler to use. Follow the guidance provided by the team in their readme for optimal results. The basic gist being:
- Disable Windows Updates (follow this advice)
- Disable Windows Defender (which we have already done)
- Take a VM snapshot so you can revert to a state before the Flare install
- Complete the installation steps provided on the readme
- Probably make a cup of tea or coffee too… Flare can take a while to install successfully
Once this has finished, do a bit of a victory dance, because you have finally and successfully set up all the configuration elements to your Windows malware analysis machine at this point. Phew, what a process.
VMWare Fusion - Debian Linux #
The following section requires VMWare Fusion to be installed on your MacBook.
You can download the ARM version of Debian here then complete the following steps:
- Just like with your Windows install, drag and drop the downloaded ARM Debian ISO onto the
Create a New Virtual Machinepopup - Select your Debian iso. If it isn’t present in the list, then click the
Use another disc or disc imageoption. - Customise settings if you are unhappy with the defaults and select finish when done
- Select an appropriate name for your VM such as
Linux Malware Analysis
Compared to Windows, that was a bit simpler. But we aren’t quite done yet.
Installing and configuring the VM #
- Select “Graphical Install” and proceed through the steps as is tradition.
- Select “Debian Desktop Environment” and “GNOME” (or your preferred option) on the software selection page to ensure the GUI is installed.
Note that during the installation process, if you set a root password, your user will not be in the sudoers file.
Now we are ready for the final configuration step, setting up inetsim and creating a VLAN in VMWare Fusion
VMWare Fusion - MacOS #
The following section requires VMWare Fusion to be installed on your MacBook.
Unfortunately, MacOS is not supported by VMWare Fusion for virtualisation as of writing this post. Makes for some frustrating times, but, it is not the end of the world. I’ll be covering another program called UTM in the next instalment of this blog that natively supports MacOS virtualisation for the purposes of malware reverse engineering.
Networking Machines #
Now that we have all the images sorted, it’s time to actually configure our internal malware network to enable each machine to talk to each other.
Why is this important? #
A great question! Often, when we perform dynamic analysis on samples, malware will attempt to perform various functions over the internet. Because we are operating in an internet-free zone, it might cause the malware to crash or close itself, so you can no longer perform analysis on the sample. Thus, we set up inetsim on our Linux machine so that it can serve the function of our DNS server and trick the malware that additional payloads are being downloaded, for example, meaning it won’t close down.
The Setup #
The analysis diagram of my malware environment shows you roughly what we are intending to complete. We will begin with configuring an internal malware network on all three VMs and then setting our Debian box as the DNS server for both the Mac and Windows machines.

Our objective here is to make both the Windows and Debian systems talk effectively to each other, running inetsim. Installation and setup of this program allows a deeper knowledge and understanding of network indicators present in some (most) strands of malware.
Creating the VLAN in VMWare Fusion #
- From the top bar, select
VMWare Fusion>Settings>Network - Click the lock at the bottom of the network panel and enable changes
- Click the
plusbutton at the bottom of the network panel and type into the subnet IP10.10.10.0or whatever your number preference is. Additionally, make sure that theallow virtual machines on this network to connect to external networks (using NAT)is unticked. You can optionally configure this to work via IPv6 if you’d like, I just normally opt for IPv4. - Click apply
- Double-click the newly created network and rename it to something that stands out to you - like
Malware Analysis - When you’re happy with the changes, click the lock again to prevent further changes to your configs
And you’re done! This new network should now be available to select for all of your virtual machines. You can add the hosts to it and confirm that the internet cannot be accessed by any of the machines.
Installing and configuring inetsim on Debian #
This is a very handy program that serves the default inetsim file with the name of any requested file. It serves as a nice way to trick malware into thinking that it has successfully downloaded second stage payloads. There are a few little steps to configure it correctly, that we will complete below:
- Open a terminal and download
inetsimsudo apt-get update && apt-get install inetsim - Create a snapshot at this point of your box
- Switch your linux box to your malware dev network and query the ip address it has allocated.
- Use your editor again to inspect the
inetsim.conffile located at/etc/inetsim/inetsim.conf. Inspect the available services - by default all of these will be on. Feel free to disable any you don’t want or need. - Next, locate the
#service_bind_address 10.10.10.1line in the config file. Uncomment the line and replace the IP address with0.0.0.0 - Locate
# dns_default_ip 10.10.10.1and once again uncomment and change this to the assigned IP address on your malware analysis network - Once this has all been completed, save your changes and exit out of your editor. Then proceed to reboot
inetsimusing the following command:/etc/init.d/inetsim restart - Issue a
netstat -plantorss -plant(depending on whether you have netstat installed) to check thatinetsimis now bound on the malware analysis network address.
Note that you can also, optionally, statically assign the IP address of your Debian host on the malware network. I don’t tend to do this often, as sometimes I like to revert the image to a snapshot that I can dynamically allow access back to the internet (to facilitate the download of additional, useful tools if the need arises).
Client - Windows Network Config #
Now that inetsim has been sorted, we need to set up our Windows machine to test and confirm that the changes we have made are effective. Switch over to your Windows machine, slap on that Malware Analysis network to your adapter and complete the following steps:
- Click on your network adapter in your Windows 11 VM and select
Network & Internet Settings>Change adapter options> right clickEthernetand selectProperties - Double-click IPv4 and set your IP address to match your newly configured malware network i.e.
10.10.10.2with a subnet mask of255.255.255.0 - Set the DNS server address to the address of your Linux machine and then select okay.
- Select okay until you return to your adapters and then open a web browser. Try to navigate to a random address such as
www.hotmail.com. If your configuration to inetsim worked, you should see the following page displayed to you:
- Once you have confirmed that this works, return to your linux VM and take a snapshot of it.
Tool List #
Every Apple Silicon analyst will have a different option on the correct or best tools you should leverage to make a functional and safe environment for your analysis of malicious programs. The following table is subjective and reflects my own experience running or interacting with these systems. I don’t think here is a perfect solution to this, but hopefully through trial and error yourself, you’ll find one of the following most suited to the setup you require to perform your own types of analysis successfully.
| Program/Tool | Description | Best used for… |
|---|---|---|
| UTM | A virtualisation platform (like VMWare, Parallels etc.) that enables you to virtualise x86 operating systems on an ARM processor. The software leverages QEMU wrapping to effectively allow this to happen. There are currently some bugs associated with this (such as networking being quite finicky and at time of writing this article, largely inoperable). It is available on the App store quite cheaply (currently requiring no reoccurring subscription to the product) | Virtualisation of x86 operating systems on ARM |
| VMWare Fusion | VMWare’s answer to virtualisation on MacOS base systems. Good networking capability and runs ARM virtual machines smoothly. Individual user licence for Fusion is currently free, but this might change in the coming months as Broadcomm continues to integrate the company and potentially changes the structure/price of their offerings. | Virtualisation of ARM operating systems and creation of an internal malware network for safe analysis of malicious programs. |
| Parallels | Subscription-based virtualisation platform for ARM based processors. This option can be quite expensive, and personally I haven’t been in a position to actually leverage this first-hand due to budget constraints (I feel like there are honestly cheaper options available than this, that serve the same purpose). By all reports, a good solution to virtualisation if you can afford it. | Corporate solutions to virtualisation on Mac/if you have the budget to afford it. |
References & Resources #
| Resource | Description |
|---|---|
| UTM Documentation | Extensive documentation written by the developers of UTM to assist you in getting the most out of the program. |
| Apple Virtualisation Framework | Documentation from Apple Inc. to assist in the creation of virtualisation platforms from scratch. Also gives extensive information about how virtualisation works (APIs, etc.) |
| OA Labs | A great reverse engineering resource available on YouTube. The folks at OA labs talk through specific topics of interest to those new or more experienced in the field. This particular talk runs you through how to virtualise Windows on Apple Silicon. |
| Windows 11 ARM Download | Link to download the Windows 11 ARM insider preview. Note that you will be prompted to create an account if you haven’t already, when navigating to the website. |
| Debian ARM Download | Link to download the ARM installer for Debian Linux. You don’t have to use this variant of Linux, feel free to pick a different distribution that appeals to you more. |
| VHDX to VMDK conversion | A guide for conversion of VHDX images to VMDX to install via VMWare Fusion. |
| UTM ARM Guides | The UTM guides for installing ARM images via UTM. Can be applicable to general ARM installs. |
| Flare VM Repo | The link to install Flare onto your Windows VM |
Parting Thoughts #
This blog focuses on setting up a safe environment leveraging VMWare Fusion 13 for MacOS. Unfortunately, it comes with a few caveats where we cannot entirely create an environment suited to analysing malware across MacOS, Windows and Linux environments. I intend on publishing a second blog in the coming days that captures how to achieve this using another program called UTM. This virtualisation platform has the added benefit of allowing us to also virtualise x86 platforms (which is very exciting). Just like VMWare Fusion, this program comes with some limitations and frustrations that we will discuss next time.
For now, I hope that this article has helped shed some light on how to effectively and safely configure a malware analysis environment on Apple Silicon computers.
